Friday, July 29, 2011

Buttery Caramel Sauce


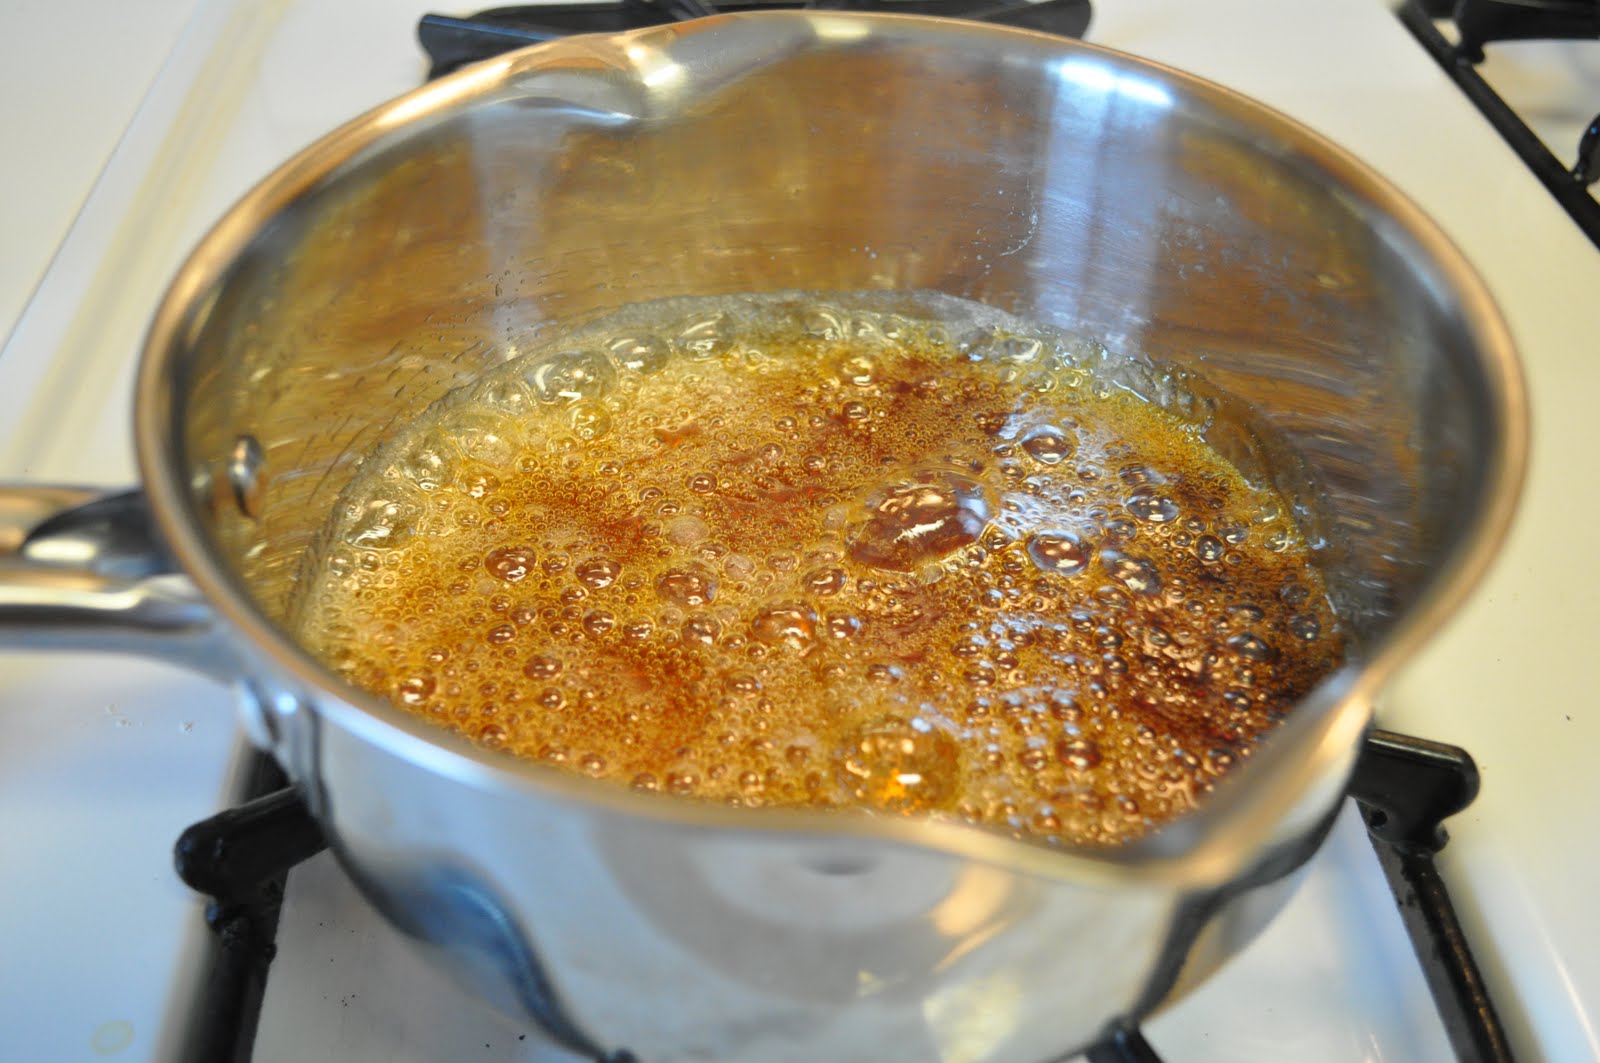
HOLY MOLY!!! It's been forever since I've blogged! I've been super busy....well, I've been busy with school and just getting into a good balanced schedule. I actually made this quite a while back and let me just say it was not easy finding a good recipe....I ended up with a lot of wasted, not-so-tasty caramel sauces. One recipe was from a chef featured on Food Network (I swear their recipes are sometimes the worst ones I find)...I'm not going to name names because that's not what I want my blog to be about. You can see in the picture above...bad batch on the left (super bitter)...and good batch on the right (buttery caramely goodness). I finally found a good compromise between a bunch of recipes and came up with the recipe below. It worked out great for my caramel macchiatto cupcakes, on top of vanilla ice cream for a sweet treat...and even on top of bananas to make my day that much more unhealthy (but delicious!). Fair warning: caramelizing sugar is a process that happens VERY quickly, so you need to be ready with ALL your ingredients..and it boils hotter than water so you have to be VERY VERY careful to not burn yourself. Other than that, it's really easy! I wasn't able to get ALL the pictures I wanted of the process, because (again) the process happens very fast.

This is where you'd add your cream and it would bubble up like crazy....I didn't have enough hands to take that picture!


Sunday, June 26, 2011

Watermelon-Ginger Liquado


My two favorite drinks ever have come from two visits to Central America. In Belize, I had a Watermelon Liquado (pic directly below)...basically a watermelon slushie. And in Costa Rica, I had a lemonade with fresh ginger root. Both simple and wonderfully refreshing. Why not merge them? All you need is a blender and few simple ingredients!


Thursday, April 28, 2011

Pizza Chicken

I came up with this recipe a while ago when I had a bunch of leftovers laying around and had a craving for pizza....but didn't want all the carbs/calories that go along with it. I'm not going to lie...it's NOT pizza, but it's a decent substitute. I included more pictures, because this is more of a method recipe...you can really change up the ingredients to your preference.

2 Chicken Breasts
Sliced Turkey Pepperoni
1 C. Shredded Mozzarella Cheese
Olive Oil - approx 1 Tbsp.
Italian Seasoning
Salt & Pepper
1 bottle of pizza sauce (I didn't use all of it)
Green Pepper, chopped
1 C. Mushrooms, sliced
1/2 Onion, chopped
1 Small Can Sliced Black Olives


Cut the chicken breasts in half and then flatten. I've found the best way to do this is on a cutting board with plastic wrap on top and then beat the hell out of it with a hammer.


Put 6-10 turkey pepperoni pieces on the flattened chicken. And then add about 1/8 cup of cheese to each piece. Roll the chicken and secure with toothpicks.

*Note how many toothpicks you put in, so that you can take all of them out after cooking and you won't have to worry about biting into one while you're eating.


Once securely rolled, you'll want to salt and pepper both sides and sprinkle some italian seasoning, for fun.


Heat a pan on medium/medium-high heat. Pour in olive oil and once heated, place the pieces in the pan with the edge face down (this helps the chicken keeps it shape). Cheese and pepperonis will likely fall out...just shove them back in the chicken and call it good. When the bottom is just browned, flip the pieces and brown the top. The goal isn't to cook the pieces all the way through, just give it a nice golden brown outside.


Preheat your oven to 350 degrees. In a 9x13 baking dish, spread a thin layer of pizza sauce. This helps to keep things from sticking. Lay the pieces of chicken down in the pan and pour pizza sauce over each piece.


In the same pan you cooked the chicken in, heat back up to medium heat and throw in your pre-sliced and chopped veggies. Cook until peppers are tender, but not soft.


Toss veggies onto chicken pieces...some will fall off to the side, which is totally fine. I also sliced up some more turkey pepperoni and threw that on top.


Put the remaining cheese on top of veggies...use more or less...depending on your preference.
Bake in the oven for 30 minutes, uncovered.

DIG IN!


Wednesday, April 6, 2011

Fried Rice...


...perfect for when you have tons of leftovers to use up!


Leftover list:

Rice Onion

Green Onions

Teriyaki Pork Loin


Things I had to buy:

Bag of frozen peas and carrots


Usually stocked items:

Soy Sauce

Oil

Eggs

Fresh Ground Pepper


Seriously...cheapest meal ever!


I got a wok for Christmas and this was the perfect opportunity to test it out. The only thing I really know about cooking fried rice is that it's best to use cold and old rice (not moldy old, but a good couple days in the fridge old). I'll put down the exact amounts I used....along with instructions, but this is the best dish to play around with amounts...different meats, veggies, oil, etc.


Fried Rice Recipe:

8 oz. teriyaki pork loin, cooked

1 16 oz bag of frozen peas & carrots

4 eggs, scrambled

4 green onions, chopped

1/4 sweet onion, chopped

4 c. old & cold rice

2 Tbsp. coconut oil, divided

Soy sauce, to taste

Fresh ground pepper, to taste


I divided up my frying...instead of doing it in one huge heap.

*Frozen Peas & Carrots

*Eggs & Green Onions

*Meat & Sweet Onions

*Rice

*Everything Together


You'll want to make sure that you're frying quickly, on med/med high heat. Add

about 1/2 Tbsp. coconut oil to wok. When it begins to smoke, add peas & carrots. Make sure you don't over cook...you want them heat through, but still crisp. Try not to go stir-crazy when you're frying...give it some time to cook on the bottom and then stir. You'll quickly find a good rhythm. Have a medium-large bowl set aside. When peas and carrots are done, toss them into the bowl. Add 1/2 Tbsp more oil into the wok, let heat up, and then add the scrambled eggs and onions and then toss in the bowl w/ veggies when cooked through. Repeat the same steps for the meat & onions. For the rice, you'll want to make sure to break up any clumps with your fingers. You'll follow the same steps for the rice. When the rice is done...dump in all the ingredients from the bowl and stir until heated through. Remove from heat and stir in soy sauce and fresh ground pepper, to taste.


Yields 8 Servings @ 1 c. per serving


WW+ Stats:

6 pts per serving


Sunday, April 3, 2011

Buffalo Wing Fake Out


I love love love buffalo chicken wings, but unfortunately they don't really fit into my diet plan these days. I figured out a healthy way to enjoy that hot buffalo kick...and I found it's less messy and super easy....BONUS!


Pulled Buffalo Chicken Recipe:

4 frozen boneless, skinless chicken breasts

1 12 oz bottle of Franks RedHot Original

1 1 oz packet of Ranch Salad Dressing & Seasoning Mix

2 Tbsp butter (optional)

No joke about how easy this is. Place chicken in crock-pot. Pour hot sauce on top. Sprinkle ranch seasoning over everything. Cover and cook on high for 3-4 hours....or on low for longer. You'll know it's ready when you go to grab a piece of chicken with a fork and it completely falls apart. So once we're at that part. Take out the chunks of chicken and shred with two forks. It almost shreds itself, just by looking at it. Put the shredded chicken back into the crock pot to mix with the sauce. If you'd like, add the butter at this point.


Ideas for this recipe:

Pulled Buffalo Chicken Sandwiches w/ Coleslaw.

Buffalo Chicken Pizzas

Buffalo Chicken Wraps

Eat it straight from the crock pot when no one's looking......


Yields 8 Servings @ 1/2 c. per serving


WW + Stats:

Chicken = 4 pts.


I went to Albertson's Deli to pick up some coleslaw. What I do is rinse a cup of coleslaw under cold water. It removes all the fatty mayo and the cabbage and good veggies still have a bit of that sweet coleslaw-ish taste. So...I throw that in a bowl with 1/2 c. of the chicken. It fills me up and it's only 4 WW+ points. Can't beat that! For the husband....I just toss a big scoop of coleslaw (not rinsed) and a scoop of chicken on a sandwich thin and call it good. As you can see below...he's happy.


Thursday, March 31, 2011

Thai Night!


This is a night of firsts! First time cooking Thai food. First time using my Martha Stewart red dutch oven. I swear if she wanted to marry me and we lived in a state that allowed it...I would in a heart beat. Anyways....also the first time the hubby cooked dinner with me...fun!

Despite what you're thinking from my last two posts, I do cook a lot of healthy dishes. I am currently doing Weight Watchers so on recipes like this one, I will include the PointsPlus values. The recipe is a random mix of recipes I found online and just plain good sense. And I bulked it up with A LOT of veggies! It may not be authentic Thai, but the hubby and I enjoyed it.


Green Pineapple Curry Recipe:

2 Tbsp Thai Kitchen Green Curry Paste

2 cans coconut milk (lite)

3 boneless/skinless chicken breast, cut into bit size pieces

3 Tbsp Soy Sauce (you could use fish sauce, if you're into that sort of thing)

2 Tbsp Brown Sugar

1 can bamboo shoots

3 carrots, peeled and chopped into cute diagonal pieces

1 red bell pepper, chopped into bite size pieces

1 green bell pepper, chopped into bite size pieces

1/2 onion, chopped into bite size pieces

1 c. pineapple chunks (we chopped in half...you can leave big if you want)

Serve with Jasmine Rice (follow directions on package)


I used my dutch oven over medium heat. Pour in coconut milk along with curry paste until it's well incorporated. As that comes to a simmer, toss in the chicken, soy sauce, brown sugar and bamboo shoots. Cover and cook for about 20 min. While that's cooking, you can start making your rice so it's ready when the curry is done. After that, dump in all the fruits and veggies, cover again and cook until the veggies are at your preferred consistency (for me..it was approx 15 minutes).

Note: if you like a thicker sauce...just mix a couple Tbsp of flour to equal parts water and then pour into the curry...that should thicken it right up!

*To make it more spicy - add thai chilles or crushed red pepper flakes*

Pour over rice and enjoy.

Yields 6 servings @ 1 1/2 cups each serving


WW+ Stats:

Curry = 8 pts.

Rice = 3 pts.

Total Meal = 11 pts.


Wednesday, March 30, 2011

Buttermilk Bacon Scones w/ Maple Glaze

Maple Bar + Bacon = Heaven
This concoction has become quite popular and can be found at a lot of doughnut shops these days. I wanted to make something similar...toyed around with the idea of a maple bacon bar inspired cupcake (I still may tackle this), but I decided on a bacon scone drizzled with a maple glaze. I love scones, so this was perfect! And I got to use the dough hook on my Kitchen Aid mixer (I love you husband) for the first time, too...BONUS! These turned out delicious and the recipe can be altered by just replacing the bacon with cranberries, raisins, chocolate chips, etc. You can then make any glaze with powedered sugar and liquid (i.e. fresh squeezed orange juice, extracts, syrups, etc.). Experiment...I dare you!


Buttermilk Bacon Scones w/ Maple Glaze Recipe:

Scones

1 c. Buttermilk

1 egg

2 Tbsp Sugar

3 1/2 c. Flour

2 tsp. baking powder

1 tsp. baking soda

1/2 tsp. salt

1/2 c. melted butter (unsalted, if you have it)

1/3 c. chopped/crumbled bacon (try baking your bacon...the texture turns out great)


Preheat oven to 400.

1. Beat together the buttermilk, egg and sugar.

2. Mix 3 cups flour together with the baking powder, soda, & salt.

3. Add about 2/3 of the flour mixture to the buttermilk and stir well.

4. Gradually add the melted butter, incorporating it throroughly into the mixture.

5. Stir in the remaining flour mixture and the bacon. (this is where the dough hook comes in handy, if you have one)

6. You may have to add a bit of flour to form a stiff dough.

7. Turn the dough onto a lightly floured surface and knead for several minutes.

8. Divide into 3 equal parts and shape each part into a thick circle about 4-5 inches across.

9. Cut the circles into quarters with a sharp knife and arrange on a cookie sheet that has been buttered or covered with parchment paper (my preference).

10. Bake in preheated oven for 20-25 minutes or until lightly browned (watch that you don't overcook...they'll dry out!)

Glaze

1 1/4 c. Powdered Sugar

1/2 c. Maple Syrup (the real stuff)

1 tsp. Vanilla Paste (or extract)

Combine the three ingredients and then drizzle over the scones after they've cooled for 5 min...or longer. (the warmer the scone, the thinner the glaze will be as it coats)

Tuesday, March 29, 2011

Komski Krunch


Last May, I went down to San Diego for some dental work and got to meet up with my cousin, Jayme. We explored Coronado Beach and all the little shops, including a candy shop (perfect for having my teeth just worked on). I think it is called Fuzziwigs Candy Factory...don't hold me to that though! They had the usual candy shop goodies...but they also had things like Ruffles potato chips dipped in caramel and then chocolate (OMG) and these cadies they called "Coronado Crunch." These were amazing, but all I remember is that it had peanut butter, chocolate, rice krispies, and marshmallows. Of course, a simple Google search of "Coronado Crunch recipe" pulls up nothing. For my first attempt at recreating...or coming close....I think I did a pretty good job. And no offense to the candy shop folks....I think I like my version better. You may be wondering about the name....I named it "Komski Krunch" mostly because I lack creativity and I kind of miss my maiden name.


*If you need a Pampered Chef consultant and/or would like to purchase one of these, let me know and I will provide contact information for my gal, Cynda. She's awesome!


Look at what I can do!

Whoa - My first blog post...EVER! This whole blogging thing is quite daunting. All the set-up...making sure it's pretty...and then coming up with entertaining things to say. Hopefully the pictures of scrumptious food and recipes will be distracting from my lame attempt at entertainment.